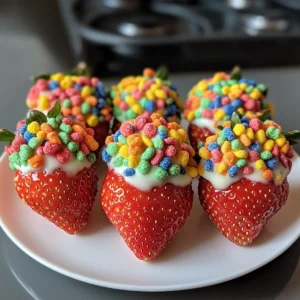
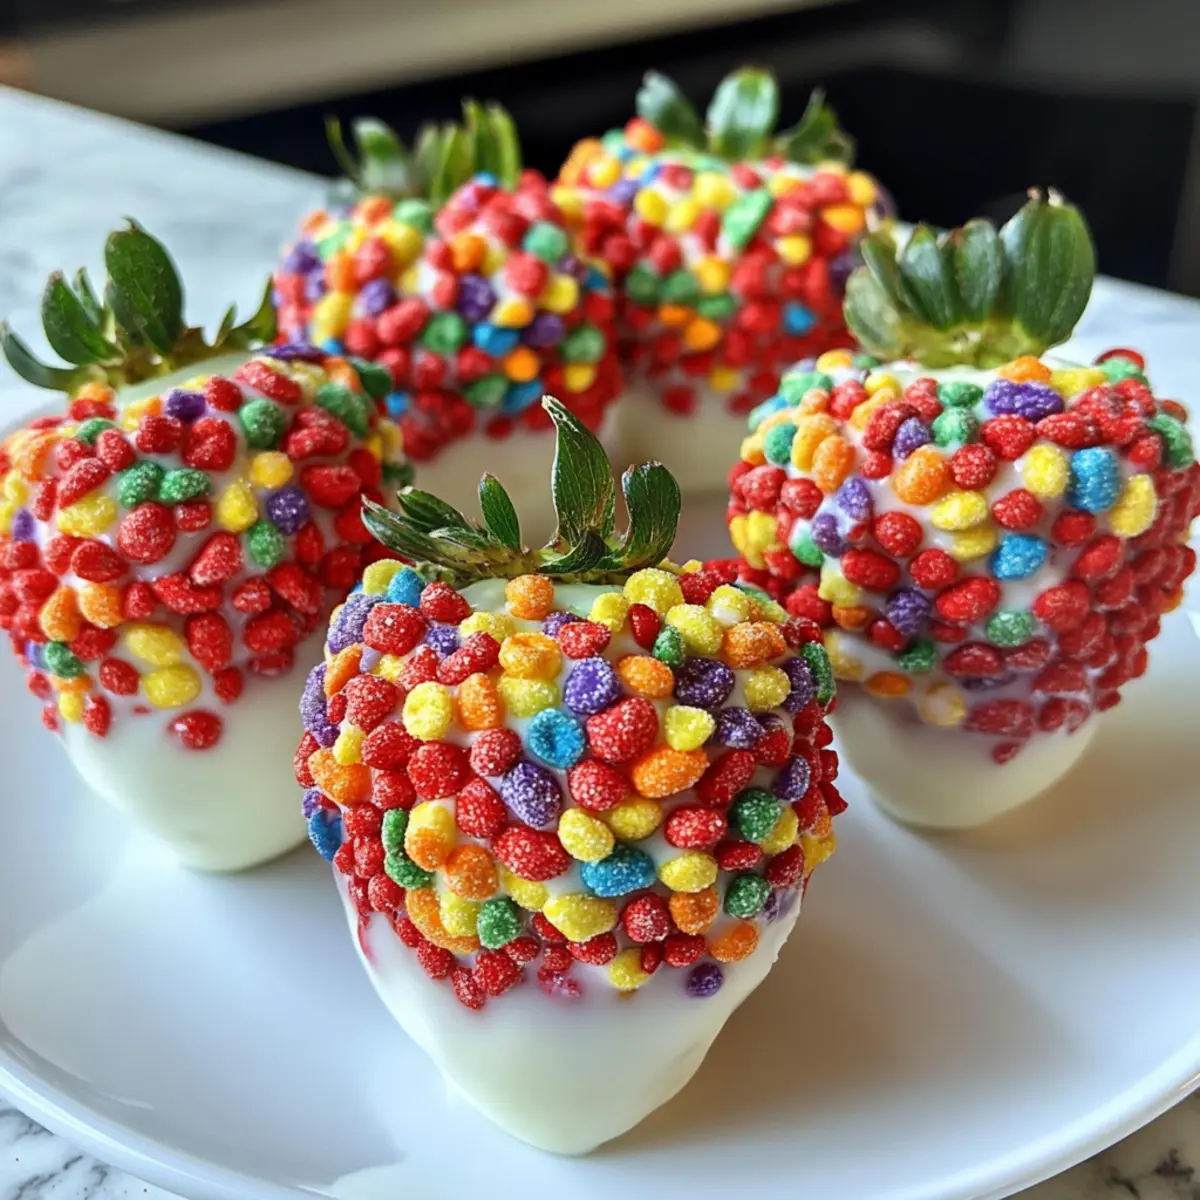
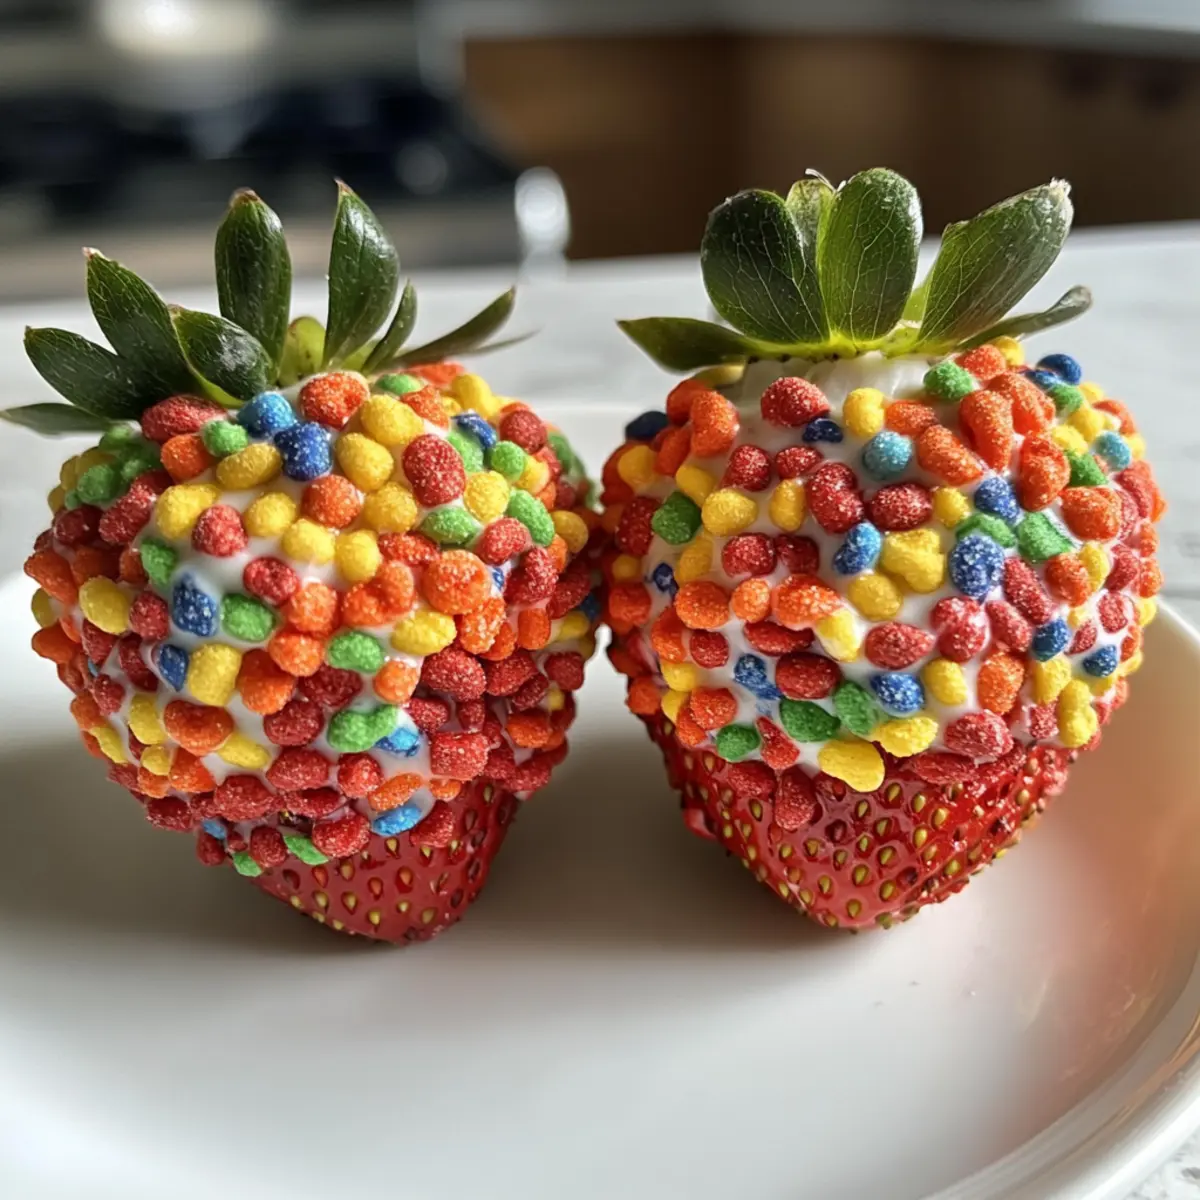
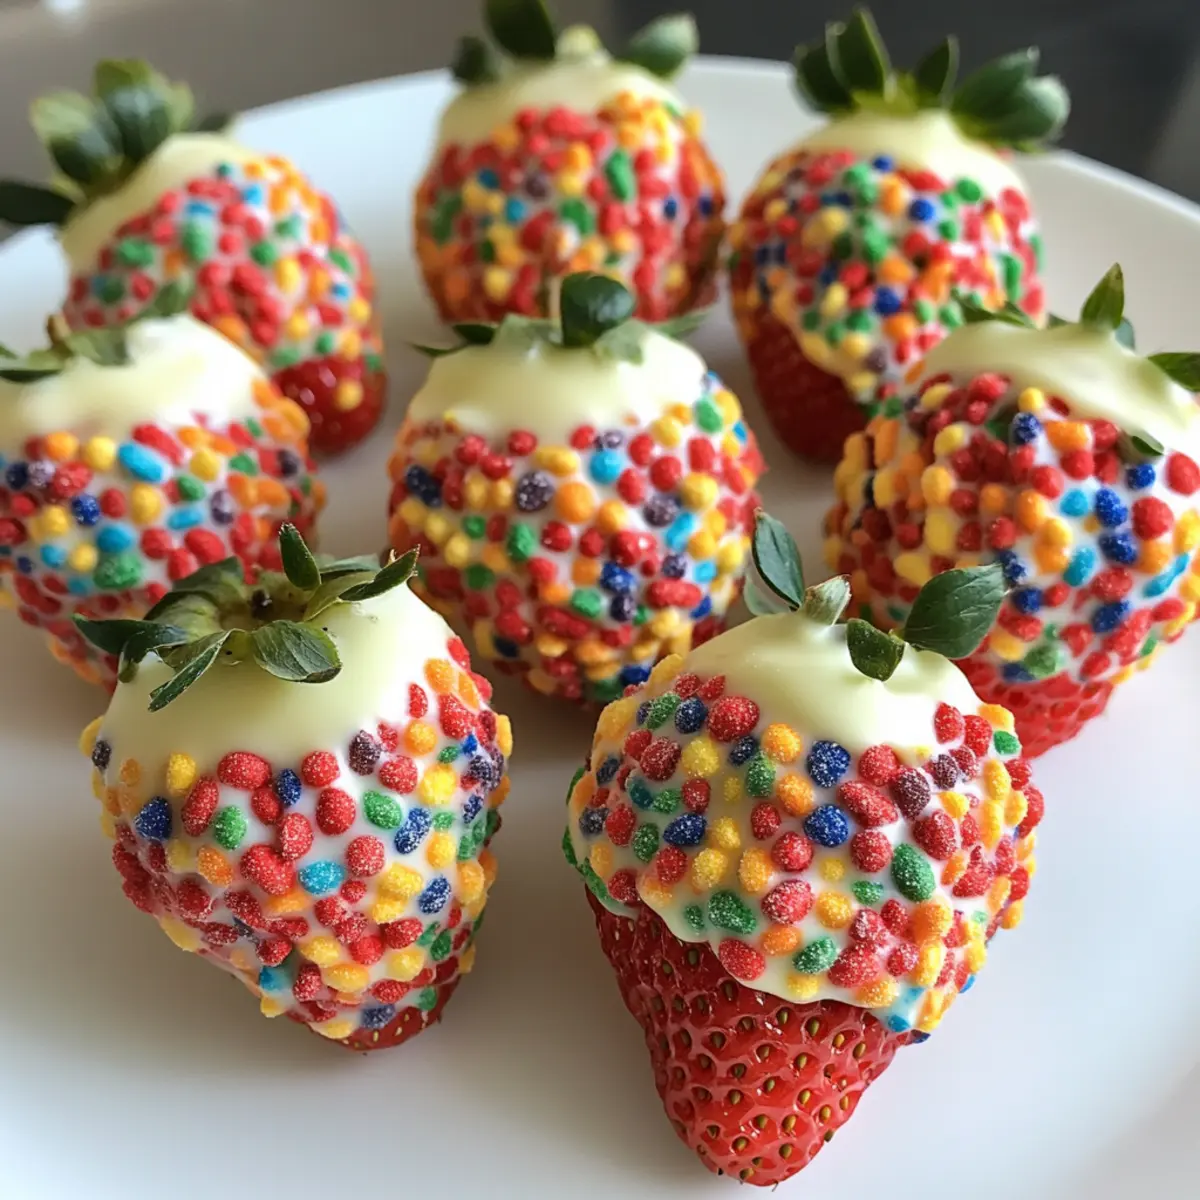
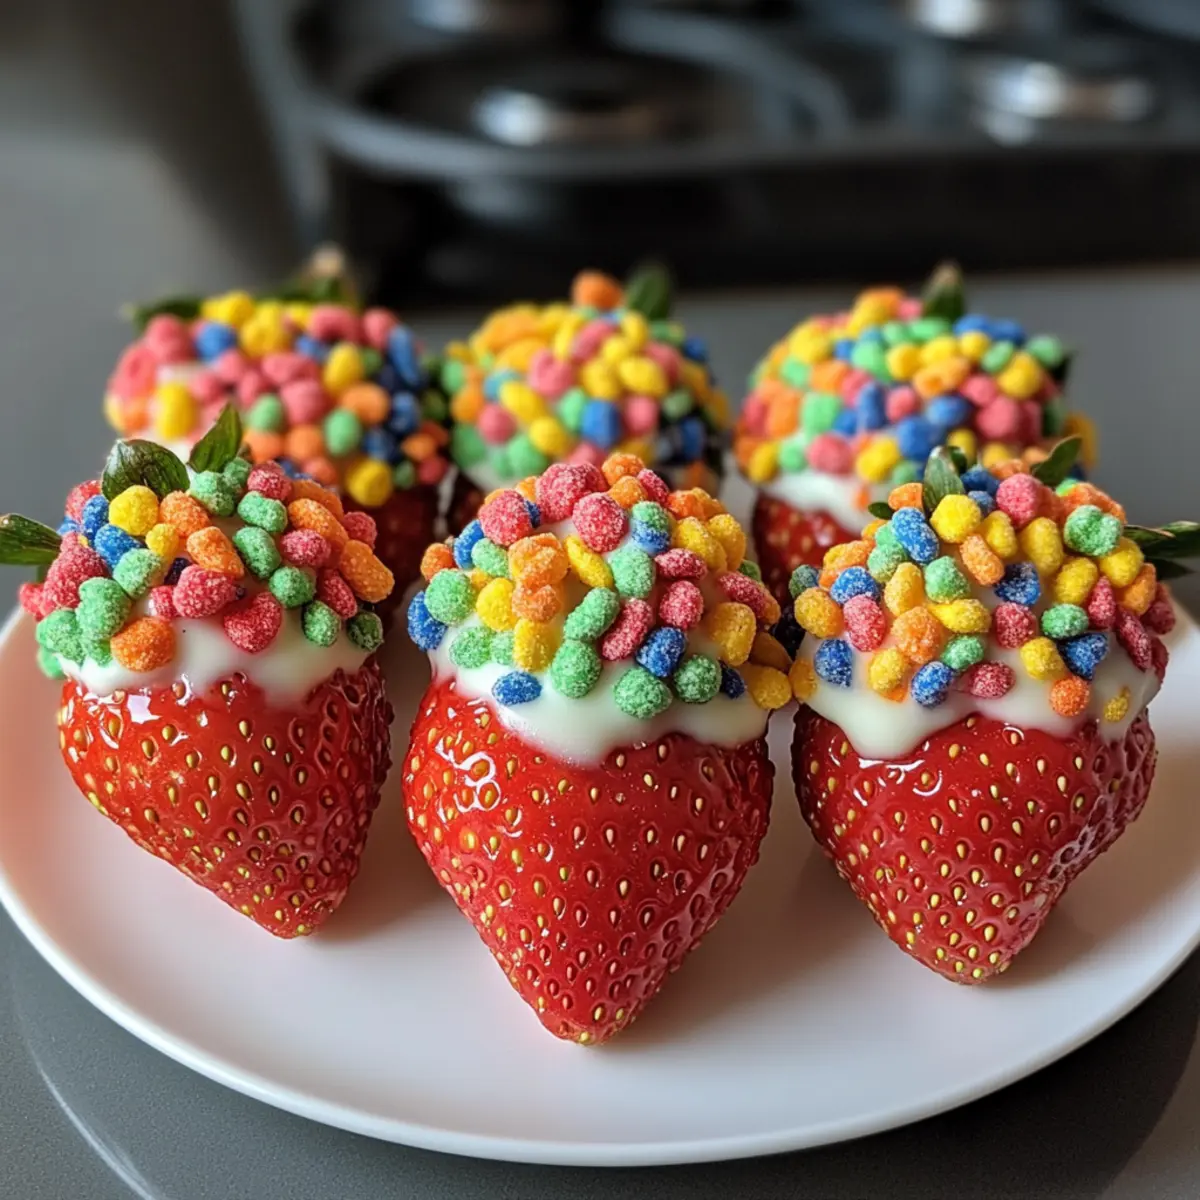
As I was preparing for a weekend gathering, the delightful idea of Fruity Pebble Strawberries popped into my mind. These vibrant, fun snacks are a spectacular way to blend the nostalgic crunch of Fruity Pebbles with the refreshing juiciness of ripe strawberries. In just 25 minutes, you can whip up this crowd-pleaser, making it an ideal treat for kids’ parties or a playful after-school snack. With their creamy vanilla candy coating and colorful cereal crunch, these strawberries are not just easy to make but also visually stunning, sure to impress your guests. Are you ready to bring a burst of color and joy to your next event? Let’s dive into this irresistible recipe!
Why Make Fruity Pebble Strawberries?
Colorful and inviting, these Fruity Pebble Strawberries are a delightful way to brighten up any gathering. Quick preparation allows you to whip them up in just 25 minutes, making them perfect for parties or after-school snacks. Crowd-pleasing appeal ensures even picky eaters will adore them. Plus, versatile variations mean you can experiment with different fruits or add a chocolate drizzle to enhance the fun! Looking for more exciting ideas? Check out these Cheesecake Deviled Strawberries for a sweet twist! Enjoy this playful treat that combines the joy of childhood with the freshness of fruit.
Fruity Pebble Strawberries Ingredients
For the Strawberries
- Fresh Strawberries – Use fully ripe strawberries for optimum flavor and sweetness.
For the Coating
- White Chocolate or Vanilla Candy Melts – This creamy coating adheres the cereal and can be substituted with milk chocolate for a different taste.
- Coconut Oil or Vegetable Shortening – Adds a smooth melt and glossy finish; recommended for better texture.
For the Crunchy Topping
- Fruity Pebbles Cereal – These crunchy morsels bring a fun flair; feel free to substitute with similar fruity cereals if desired.
For Easy Handling
- Parchment Paper or Silicone Baking Mat – Line your baking sheet with these to prevent sticking and ensure a neat presentation.
Step‑by‑Step Instructions for Fruity Pebble Strawberries
Step 1: Rinse and Dry Strawberries
Begin by rinsing your fresh strawberries under cool running water to remove any dirt. Gently pat them dry with paper towels—make sure they are completely dry, as this will help the chocolate coating stick better. Leave the green tops on, as they provide an excellent grip when dipping.
Step 2: Prepare the Baking Sheet
Line a baking sheet with parchment paper or a silicone baking mat. This prevents the coated strawberries from sticking and makes cleanup a breeze. Set the baking sheet aside, ready for the colorful Fruity Pebble Strawberries you’ll be creating shortly.
Step 3: Crush the Fruity Pebbles
Pour your Fruity Pebbles cereal into a bowl and gently crush them with your hands or a rolling pin. You want small pieces that will adhere well to the strawberries, so avoid turning them into a fine powder. Once crushed, set this bowl aside, ready for the fun coating step.
Step 4: Melt the Coating
In a microwave-safe bowl, combine your white chocolate or vanilla candy melts with a dash of coconut oil for a smooth finish. Microwave the mixture in 20-30 second intervals, stirring in between, until completely melted and glossy, typically around 1-2 minutes total. This melting process is crucial for your Fruity Pebble Strawberries.
Step 5: Dip the Strawberries
Take a strawberry by its green top and dip it into the smooth, melted chocolate mixture. Ensure the strawberry is well-coated, then let any excess chocolate drip back into the bowl. This step creates a delightful creamy layer that combines beautifully with the fruity crunch you’ll add next.
Step 6: Coat with Fruity Pebbles
Immediately after dipping, roll the chocolate-covered strawberry in the bowl of crushed Fruity Pebbles. Use a spoon if needed to ensure each strawberry is generously coated. The vibrant colors and crunch will make the Fruity Pebble Strawberries irresistible and visually appealing.
Step 7: Place on Baking Sheet
Carefully place the coated strawberries on your prepared baking sheet, ensuring they are spaced apart to prevent sticking. This will allow the chocolate coating to set without any risk of the strawberries touching each other, giving you that perfect presentation.
Step 8: Chill to Set
Refrigerate the baking sheet with the coated strawberries for about 10-15 minutes. This chilling time helps the chocolate harden, creating a perfect shell around your fruity treats. You’ll know they’re ready when the coating is firm to the touch but still glossy.
Step 9: Serve and Enjoy
Once set, serve your delightful Fruity Pebble Strawberries immediately or within the same day for the best texture and flavor. They’re perfect for parties, after-school snacks, or any occasion that calls for a sweet, fun treat that kids will love!
Fruity Pebble Strawberries Variations
Elevate your Fruity Pebble Strawberries with these fun and imaginative twists that will add a delightful flair to your treats.
-
Mixed Fruits: Swap out strawberries for banana slices or apple wedges for a new fresh taste. The charming combination of fruity flavors makes it a hit for any crowd!
-
Dairy-Free: Use dairy-free chocolate or candy melts to create a plant-based version. This way, everyone can indulge in these colorful delights!
-
Crunchy Boost: Add crushed nuts or granola to the Fruity Pebbles for extra crunch and flavor. The added texture will surprise and please your taste buds.
-
Chocolate Drizzle: After coating with Fruity Pebbles, drizzle with melted dark or milk chocolate. This adds a rich layer of flavor, perfect for chocolate lovers!
-
Marshmallow Mix: Toss in some mini marshmallows with the Fruity Pebbles for a soft and chewy surprise. It’ll create a delightful textural contrast that everyone will enjoy.
-
Salted Caramel: Drizzle a bit of salted caramel over the top before serving for a sweet and salty combination that elevates the flavor profile of your treats.
-
Zesty Lemon: Add a dash of lemon zest to the white chocolate mixture for a refreshing citrus twist. This will brighten the flavors and add an exciting surprise!
-
Rainbow Coating: Use a mix of colorful cereals instead of just Fruity Pebbles. This visually stunning twist will make your strawberries even more enchanting—perfect for special occasions!
Experimenting with these alternatives can spark creativity in the kitchen, so don’t hesitate to mix and match! If you’re in the mood for another sweet treat, consider the delightful fun of Cheesecake Deviled Strawberries for a deliciously creamy option!
What to Serve with Fruity Pebble Strawberries?
Elevate your snacking experience by creating a delightful spread that will enchant both kids and adults alike.
- Vanilla Yogurt Dip: A creamy yogurt dip contrasts the vibrant, crunchy strawberries, providing a refreshing addition that kids will love.
- Whipped Cream: Light and fluffy whipped cream is a dreamy accompaniment, perfect for dipping or dolloping on top of your sweet strawberries.
- Banana Slices: Slices of ripe banana add a creamy texture and delightful sweetness, enhancing the fruity fun of your treat table.
- Grapes: Juicy grapes are a great choice; their plump texture and sweetness pair perfectly with the crunchy, coated strawberries for a balanced snack.
- Chocolate Drizzle: A simple drizzle of melted chocolate over your Fruity Pebble Strawberries adds an extra layer of richness and visual appeal.
- Rainbow Fruit Skewers: Combine other fruits like melon, kiwi, and pineapple on skewers for a colorful fruit display that mirrors the fun vibe of the strawberries.
- Sparkling Water: Refreshing and light, flavored sparkling water makes a festive drink choice, perfect for cleansing the palate while enjoying these treats.
- Party Punch: A fruity party punch adds excitement to any gathering and complements the sweet, playful flavors of your Fruity Pebble Strawberries.
- Mini Cupcakes: Soft and fluffy mini cupcakes are an adorable addition, creating a playful dessert pairing that kids will find irresistible.
- Ice Cream: A scoop of vanilla or strawberry ice cream offers a rich and creamy contrast that takes your fruity snack experience up a notch!
Storage Tips for Fruity Pebble Strawberries
-
Room Temperature: Best enjoyed immediately; however, if needed, you can leave them at room temperature for up to 2 hours before serving.
-
Fridge: Store in an airtight container in the refrigerator for up to 1 day to maintain freshness; covering helps prevent the coating from becoming too soft.
-
Freezer: Freezing is not recommended, as the texture of the strawberries and cereal crunch may be compromised when thawed.
-
Reheating: These treats are best served cold; do not reheat, as the chocolate may lose its sheen and the strawberries can become mushy.
Make Ahead Options
These Fruity Pebble Strawberries are a delightful option for meal prep and can save you valuable time, especially during busy weeknights or party preparations! You can prepare the chocolate-coated strawberries and refrigerate them up to 24 hours ahead of time. Simply follow the usual steps until you chill the coated strawberries. To maintain their crunchiness, avoid rolling them in the Fruity Pebbles until just before serving. When it’s time to wow your guests, roll the chilled strawberries in the crushed cereal and serve immediately for that delightful texture and burst of color! Enjoy the ease of preparing these fun treats ahead of time while ensuring they taste just as delicious!
Expert Tips for Fruity Pebble Strawberries
-
Dry Strawberries Well: Make sure your strawberries are completely dry before dipping. Moisture can cause the chocolate coating to slide right off.
-
Work in Small Batches: Dip and coat your strawberries in small batches. This prevents the melted coating from cooling too quickly, ensuring a smooth application.
-
Adjust Coating Thickness: If your chocolate coating is too thick, add a little more coconut oil to achieve a smoother, glossy finish for your Fruity Pebble Strawberries.
-
Serve Fresh for Best Taste: Enjoy the strawberries the same day they’re made. The cereal may lose its crunchiness if allowed to sit for too long, compromising that delightful texture.
-
Try Different Fruits: Don’t hesitate to switch it up! Bananas or apple wedges can make delicious fruity alternatives, giving a new twist to the classic recipe.
Fruity Pebble Strawberries Recipe FAQs
How do I choose ripe strawberries?
Absolutely! Look for strawberries that are bright red with a natural shine. The green tops should be vibrant and fresh. Avoid any with dark spots or bruises, as these can indicate overripeness. For optimum flavor, make sure they are fully ripe before using—this will enhance the overall sweetness of your Fruity Pebble Strawberries.
How should I store leftover Fruity Pebble Strawberries?
Very good question! Store any leftovers in an airtight container in the refrigerator for up to 1 day. However, keep in mind that the cereal may lose its crunch over time. It’s best to enjoy the strawberries the same day they are made for that delightful texture and vibrant flavor. If you do store them, make sure they’re separate from any moisture to avoid a soggy treat.
Can I freeze Fruity Pebble Strawberries?
I highly recommend against freezing these treats. Freezing can significantly alter the texture of both the strawberries and the cereal coating, making them mushy when thawed. Instead, keep them refrigerated and consume them fresh for the best taste. If you want to enjoy them for longer, consider preparing the components separately and assembling them right before serving.
What if my chocolate coating is too thick?
No worries at all! If you find that your chocolate coating is too thick, simply add a small amount of coconut oil to the melted mixture. Heat it again for a few seconds and stir until smooth. This added fat will help achieve a thinner, more manageable consistency that adheres beautifully to your strawberries without clumping.
Are there any allergy considerations with this recipe?
Great question! The primary ingredients in Fruity Pebble Strawberries include strawberries, chocolate or candy melts, and Fruity Pebbles. If anyone in your group has allergies, especially to dairy or chocolate, you can opt for dairy-free chocolate alternatives or ensure that your Fruity Pebbles are gluten-free. Always check package labels to avoid cross-contamination if allergies are a concern.
What if I don’t have Fruity Pebbles?
The more the merrier! If you don’t have Fruity Pebbles on hand, feel free to use any fruity cereal as a substitute. Options like Trix or Froot Loops can provide a similar crunchy texture and vibrant color. Alternatively, crushed graham crackers or nuts can offer a different fun twist to your fruity treats!
Fruity Pebble Strawberries: A Fun, Crunchy Treat for Kids
Ingredients
Equipment
Method
- Rinse your fresh strawberries under cool running water and gently pat them dry with paper towels. Make sure they are completely dry.
- Line a baking sheet with parchment paper or a silicone baking mat to prevent sticking.
- Pour your Fruity Pebbles cereal into a bowl and gently crush them with your hands or a rolling pin. Set aside.
- In a microwave-safe bowl, combine your white chocolate or vanilla candy melts with a dash of coconut oil and microwave in 20-30 second intervals until completely melted.
- Take a strawberry by its green top and dip it into the melted chocolate mixture to coat it well.
- Immediately roll the chocolate-covered strawberry in the bowl of crushed Fruity Pebbles.
- Place the coated strawberries on your prepared baking sheet, ensuring they are spaced apart.
- Refrigerate the baking sheet for about 10-15 minutes to allow the chocolate coating to set.
- Serve your Fruity Pebble Strawberries immediately or within the same day.